Overview
This project was on a council estate in central London. The council estate management team made it almost impossible for us to set up a food growing space even though in their public literature they said how great they were at providing food growing spaces for its tenants. So after almost 2 years of failing to make any headway a group of residents decided to do it on our own on a private garden within the estate. We approached a friend who was living with an octogenarian who we knew loved gardening when he was younger, and he very happily invited us to use his garden. The majority of the people who were interested in getting involved had no idea about growing food, so teaching became the priority.
Choosing a methodology
I was not so familiar with OBREDIM so I decided to give this methodology a try. I cannot justify using it for any reason other than wanting to experiment and see what its strengths and weakness are.
Working through the methodology
Observation
Patrick Whitefields 4 ways of observing
I started my observation by using Patrick Whitefields 4 ways of observing method, from which I extracted the following
Intuitive: What are your first impressions of the site?
1. How would you describe the overall site?
Barren
Unprotected
2. Close your eyes: what can you hear, smell, feel?
Hear: Neighbours; Cars
Smell: Neighbours cooking;
Feel: Wind
3. What are the relationships with the neighbouring land?
No border on south side: Neighbours want to build a big fence
Road to north: Noisy and polluted; Pedestrians walk by; Main estate through traffic
House to west: 8 story building
Road to east: Car park; Not through traffic
Objective: Observe the site rationally and systematically.
You may want to list the following (if you don't know the name of something, describe it):
1. Soil type:
Stony and poor quality
2. Climate and micro-climate:
Exposed to southerly winds; Exposed to north wind
3. Water courses and features:
None; No water catchment surfaces
4. Plants:
Only grass
5. Animals
Birds
Imaginative
Try to visualise this place in other times/states would this place have looked before humans influenced it?
1. How might it change 3 months from now?
Over grown grass
2. How might it change 6 months from now?
Longer grass; Pioneers such as dandelion
3. How might it change if humans stopped influencing it?
Scrub land
4. Go wherever you want, and do whatever you feel like...
No diversity: Only grass: Not much insect life
Subjective
How does the genius loci of this place make you feel?
Imposing building; Exposed all round; Open to walkers by
PASE of what exists
Plants
Grass
Animals
Birds occasionally
Structures
Flat: West facing window
Wall to north with a fence near the house
Short wall to east: Beyond which are cars
Events
There is a bin in the garden, which seems to be the only time this garden is used. In the past the owner used to grow veg in the bed under the windowsill.
PASE of what the client wants
Looking through the methodology I could not find an obvious place to add what the clients want, so I have added it here
Plants
Herbs; Annuals; Small shrubs; Fruits; Salads
Animals
Bees;
Lacewings; Ladybirds
Structures
Seats; Food growing beds; Compost; Winter seedling space; Water butts; Storage
Events
Gatherings (Friends sitting around just chatting); Harvesting; Tea parties
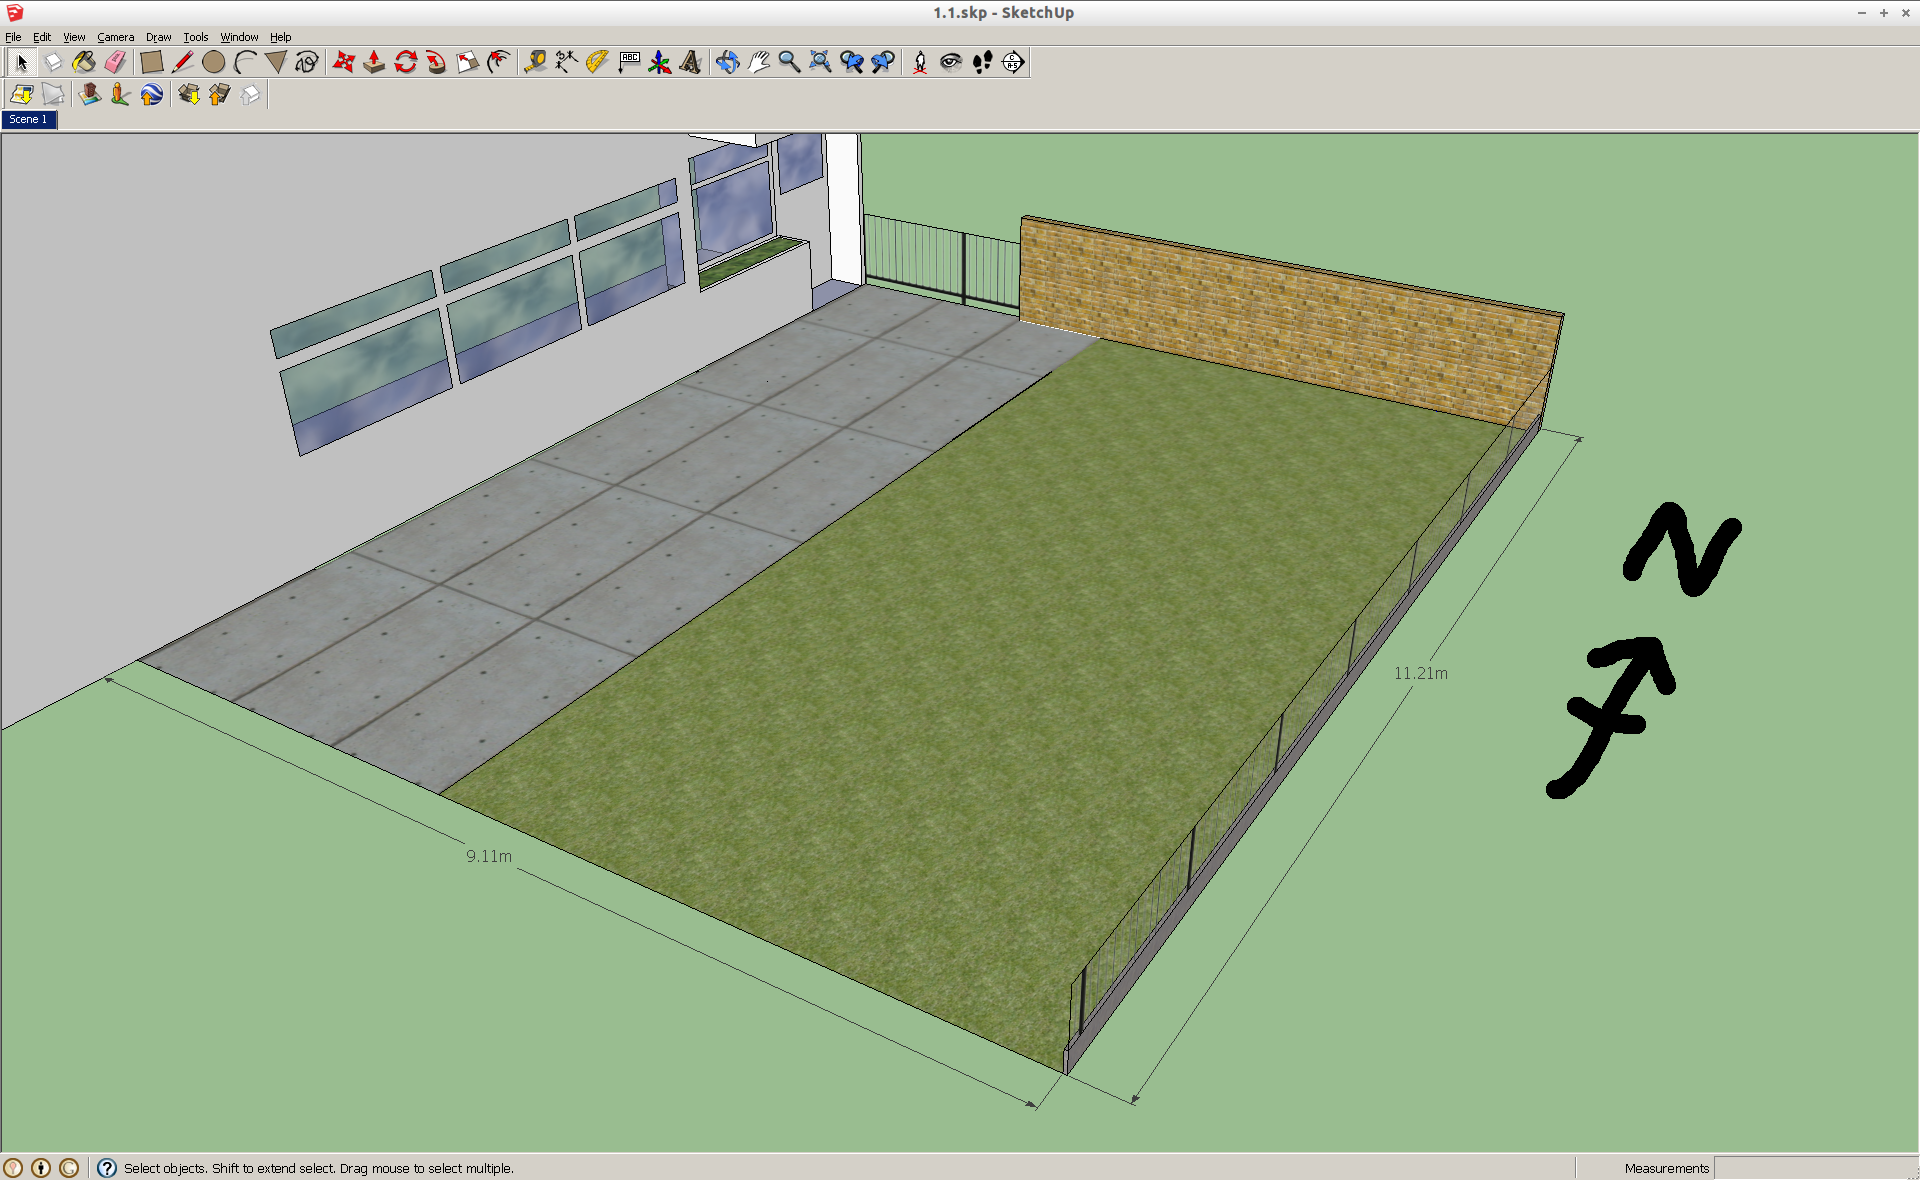
Basemap
I used google sketchup to make a 3D model of the site
Sun and shade
Here are the sun and shade maps taken at the spring and autumn equinoxes and summer and winter solstices.


Boundaries
Physical
No border on south side
Neighbours want to build a big fence
Road to north
Noisy and polluted
Pedestrians walk by
Main estate through traffic
House to west
8 story building
Road to east
Car park
Not through traffic
Lawn area
We are not allowd to grow anything in the grassy area. We are confined to drowing where the paved area is.
Other
Lack of knowledge about food growing
Site is exposed
Resources
Money
£200 from a charity supporting the owner
Seeds and cuttings
From my garden
People
Owner is in his 80's: Enjoyed gardening but cannot do any gardening here; Happy for others to garden for him
Transition Pimlico food group members: No growing skills; But a desire to learn
Evaluation
Sun and shade analysis
Here we can see the sun and shade path for the day. Typically in this place the shade appears on the paved area from just after midday, which means we only have morning sun. The following maps do not tell the full story, however using sketchup you can increment it more often to see how the sun moved through the day (I could not onclude more pics as this would have made the slideshow file too large for this site). The owner confirmed his observations of the sun and shade cycle which was very close to the sketchup maps. For growing food on this site we need to take into consideration how this site only gets half a days sun a day.
If the above slide is too quick you can look through the individual images from here
Zones and sectors analysis
The following maps are my zones and sectors analysis. Here we can see where the main winds come from as well as which zones I perceive there to be. Because the site is so small, the space immediately outside the back door is zone 1 and the rest is zone 2. We are not allowed to grow anything on the grass so I did not label this, though you could say this is a zone 5 (wild zone), but given the grounds maintenance staff will cut the grass so often it is not really a wild zone.


Resources
The key resource we have is my food growing knowledge and skill. They key need to be filled are the residents desire to learn. So the design needs to consider how we harvest as much learning, as well as food growing.
Plants
Many of the currents and berries will thrive in half a days sun, as will many alliums and letuces, etc. Of the original list of plants people said they wanted, many of the trees and bushes are not appropriate, due to size and availibility of sunlight, so we need to accept we cannot grow everything from the original list. Having said that, the main point of this design is for people to learn. It may sound unconventional, but I for one learn a lot by making mistakes. With that in mind, I will consider allowing people to experiment, even if I know it may not work. This way we can discuss things after and harvest some deep experiental learning. Some of the key things I would like to teach people is about the importance of putting the right plant in the right place. Included in that is size and positioning, as well as amount of sunlight, companion planting, etc. So I am considering teaching then aout these ideas by using the square foot gardening technique. To futher the education I will also consider making a hugelkulture, which will show them about how nature can create its own nutrients, etc.
Soil quality
The soil quality is very poor (has been paved over for maybe 70 years), so nothing will grow here except very hardy pioneer weeds. So we need to improve the soil quality. This is possible by adding organic matter and growiing a succession of pioneer plants, through to herbacsous plants, whcih will slowly but surely add life back to the soil. This however will take a long time (one full year minimum), and given we have eager students wanting to know about food growing I think this will be too long for them to wait. So in order to prevent them from waliking away and thinking permaculture takes too long, I apply obtain a yield principle, which stimulates me to think we should aim to get a yield in the first year. The only quick solution I can think of is to buy some compost/soil. Unfortunately this is not entirely environmentally friendly, so in order to weigh up if we should do this or not, I walked the students through the following SWOC tool.
SWOC on Should we buy compost/soil rather than create soil
Strength
Can get grow much faster (i.e. this season) 4
Gives people opportunity to learn 4
People wont walk away and think permaculture takes too long 4
Weakness
Needs fossil fuels to make and carry the store bought compost -4
This compost is lifeless -2
Opportunities
To teach about food growing 3
Can teach about soil regeneration via the hugle 3
Add life to the store bought compost 2
Challenges
No chellenges
Strength and opportunities = 20
Weakness and challenges = -6
20 + -6 = 14
Therefore the strengths and opportunities far exceeds the weaknesses and challenges.
The next decision we need to make is how and where to get the compost from. We walked the students through the following PMI to weigh up our options
Local hardware store
Plus
Shop is local to us (Keeps money local and we dont need to travel far or use any fossil fuel to collect)
Minus
Compost came from a long way and consumed huge amount of fossil fuel; Unlikely to get peat free; Usually a batch of the same material, which is then sterilised, so no life and little variation of nutrients, etc
Interesting
Superstore
Plus
Cheap
Minus
Compost came from a long way and consumed huge amount of fossil fuel; Unlikely to get peat free; Usually a batch of the same material, which is then sterilised, so no life and little variation of nutrients, etc
Interesting
Local council recycling centre
Plus
Local; All material for compost was collected locally; Recycled local garden waste; Peat free; Varied material (came from hundreds of different gardens)
Minus
We need to drive there and use some fossil fuel (but the centre is not so far lesst that 2km)
Interesting
Garden centre
Plus
Can get better quality compost; Can get peat free
Minus
Compost came from a long way and consumed huge amount of fossil fuel; Expensive; Usually a batch of the same material, which is then sterilised, so no life and little variation of nutrients, etc
Interesting
Based on this quick and simple PMI too (Plus, Minus, Interesting), we all agreed the best place to buy the compost from was from the local recycling centre. This was a nice exercise for the students to think about where consumable products come from and how to make decisions on what is the least environmentally destructive choice.
Design
The design process was quite straight forward. We made a map and cut out shapes to represent the different elements we wanted. We then moved things around and discussed the pro's and cons of putting the element in different places. I then took my principle cards, and turned them over one by one, and asked people to think about the implications of each principle.
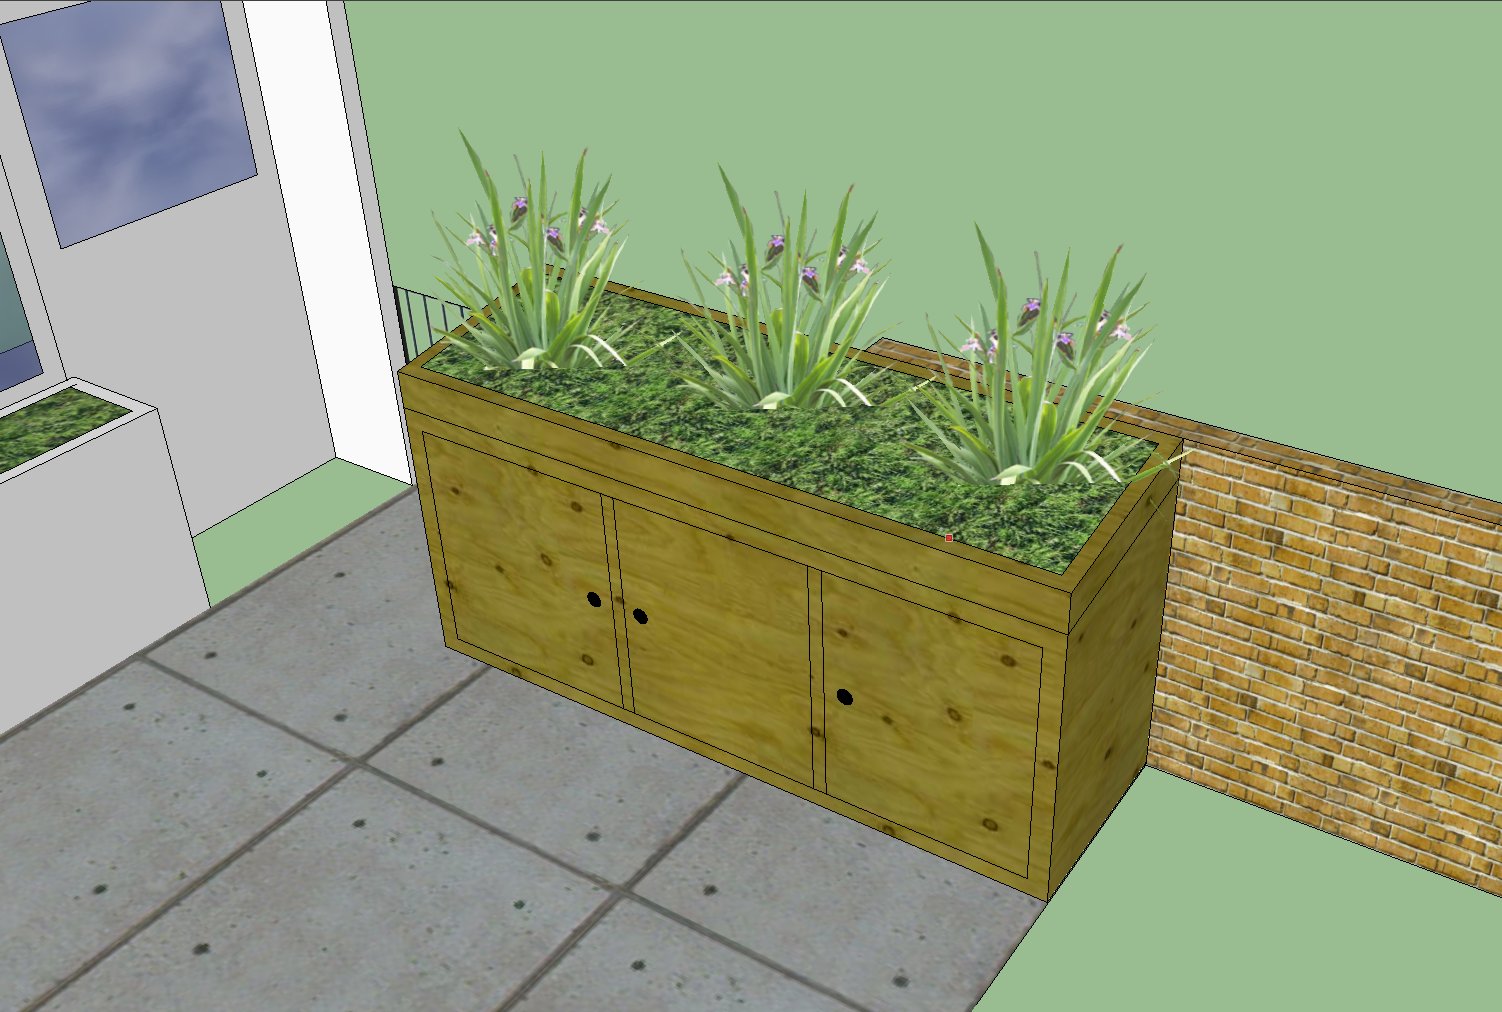
Raised bed-cum-seat-cum-storage space
Using the principles such as multiple elements multiple functions, we look at how to make spaces multi functional. This is how we came to the conclusion of making a raised bed, which also contains a seat, which also has storage space underneath. Given that this is raised and we do not want to caste shade on the food growing plots on the ground, the most logical place for this structure was to the north.
More storage space
We also added a storage space, for larger and more valuable items. We decided this should be as close to the house and back door as possible, hence we moved this north of the seats.
Square foot beds and hugel bed
We calculated the optimum size of the square food beds (4' wide by 9' long), which left us 1' between beds, plus enough room to make a hugelkulture of just over 1 meter. Given the hugel would be the tallest of the beds and therefore cast the most shadow, we placed it at the back.

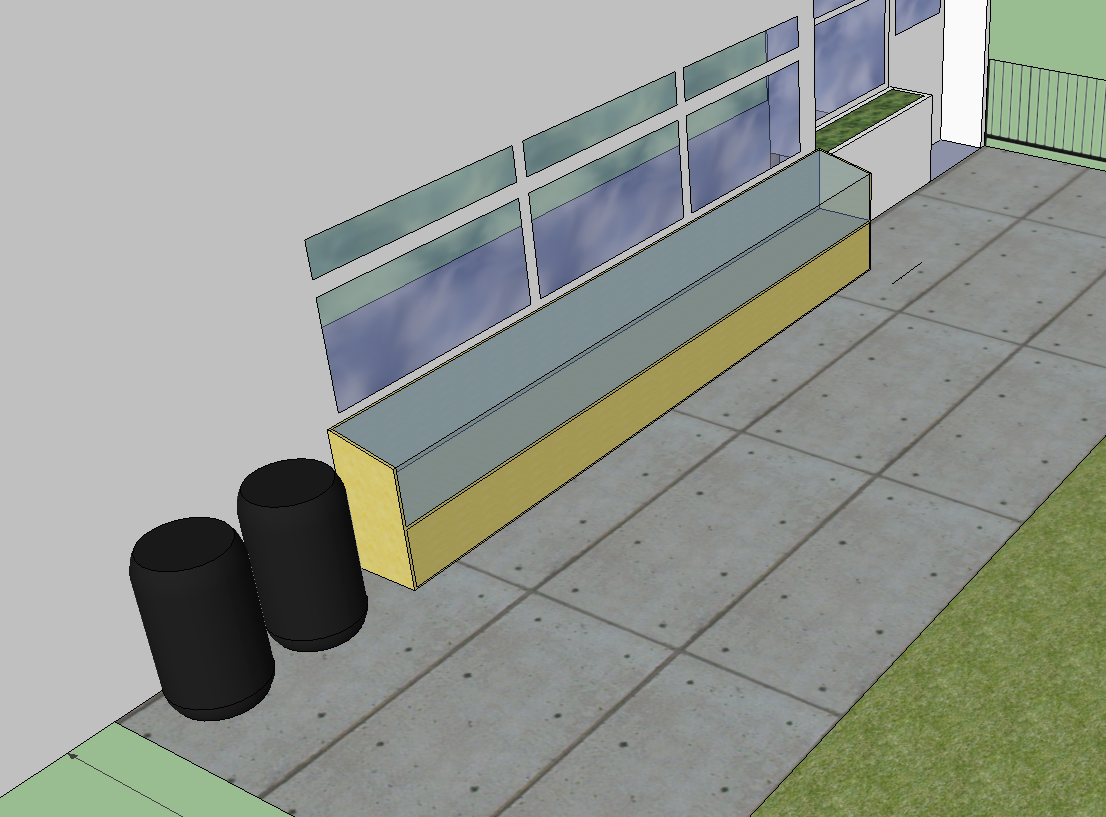
Compost bins and cloche
The next things we placed were the compost bins and cloche. The compost bin only had one realistic place to go, as they did not want the bins to be under the windows or near the door. Which left the length of the wall under the windows for a cloche. Running the design through the principles such as multiple elements multiple functions, we came to the conclusion of making it a cloche-cum-greenhouse-cum-table-cum-storage space. To facilitate this we designed how we can add glass to the frame (top and front) to make it a greenhouse, add remove either the lid or the front depending on how much sun and air we needed at different times of the year. We could also take both off so it could be used as a table. It was designed in such a way that we could do it section by section, so if at any one time we wanted some exposed, while others were covered we could easily do this. Underneath the table we made more storage space. The following picture does not show the full extent of the cloche design, as at this point we sketched out the pattern and later filled in the details (without updating the sketchup design).
Water collection
The most interesting part of the design was to look at where we get water from. There are no flat surfaces or downpipes from the building. So we had to make one. The only space we had left was to use the grassed over area, which technically we were not supposed to encroach upon. We decided that if we made it easy to move, then we would be okay. If we were asked to move it, we decided we could remove the storage by the door and place the water capture system there. The reason we did not build it there immediately was because we though it was too close to the building and we would capture more if it were further away. The design was quite simple, we bought some water barrels, and built a roof from a polycarbonate board. The water caught on this was channelled into the first water barrel, which would then overspill into the next and so on. The final overspill we decided should go to the base of the hugel. We made sure we would have a tap high enough on the barrel so that we could water the raised bed without needing a pump.
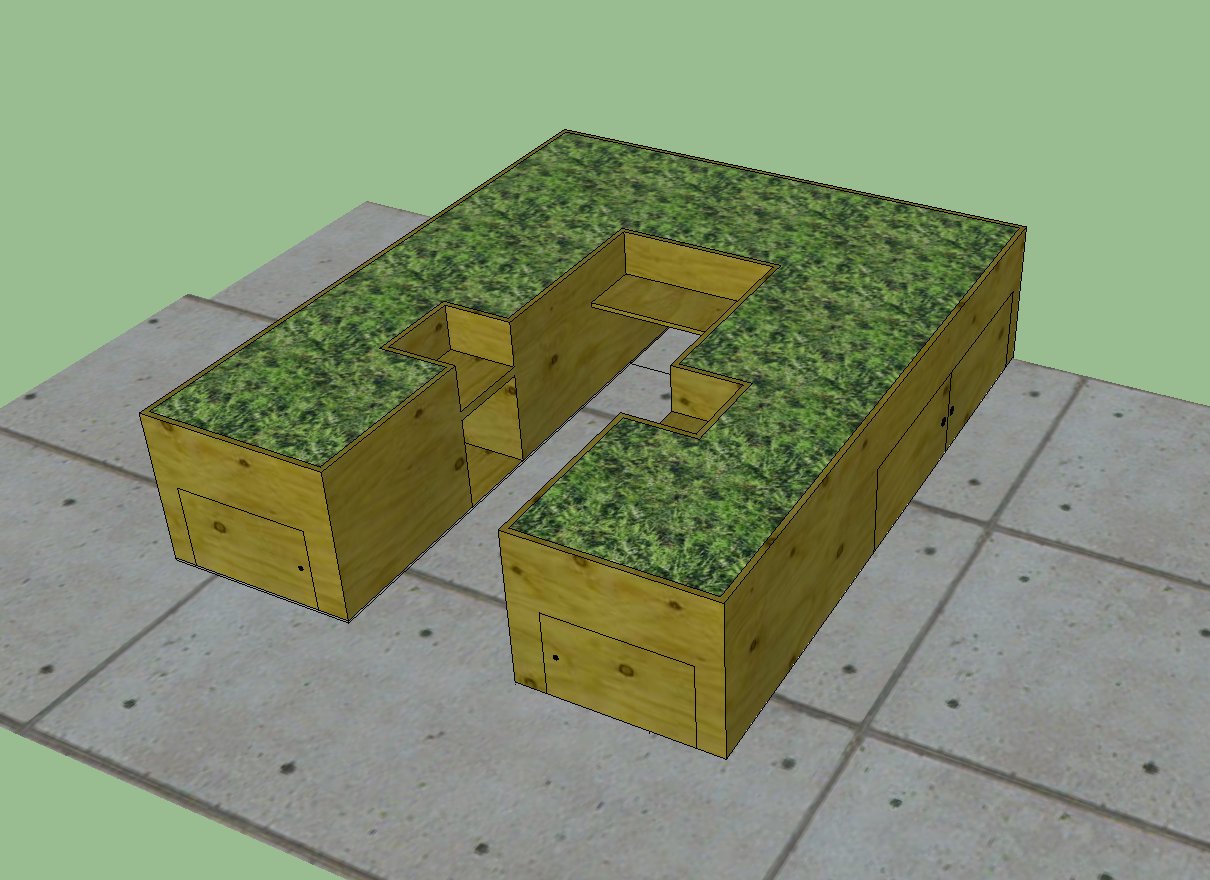
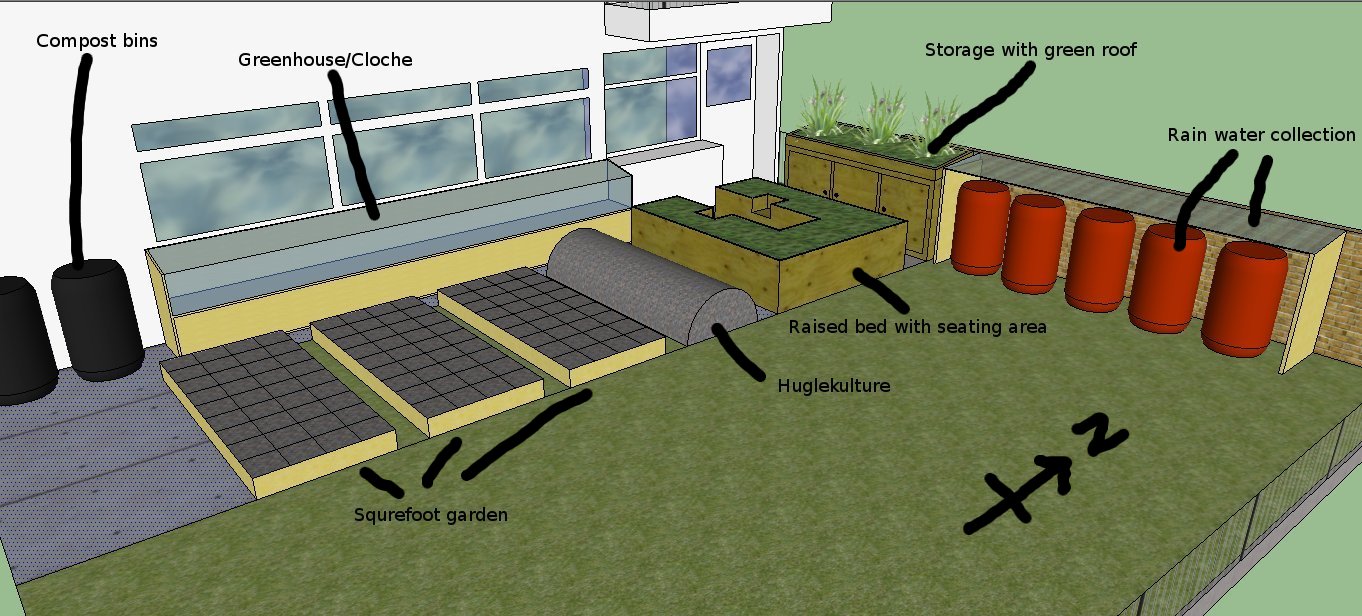
Here is the final design
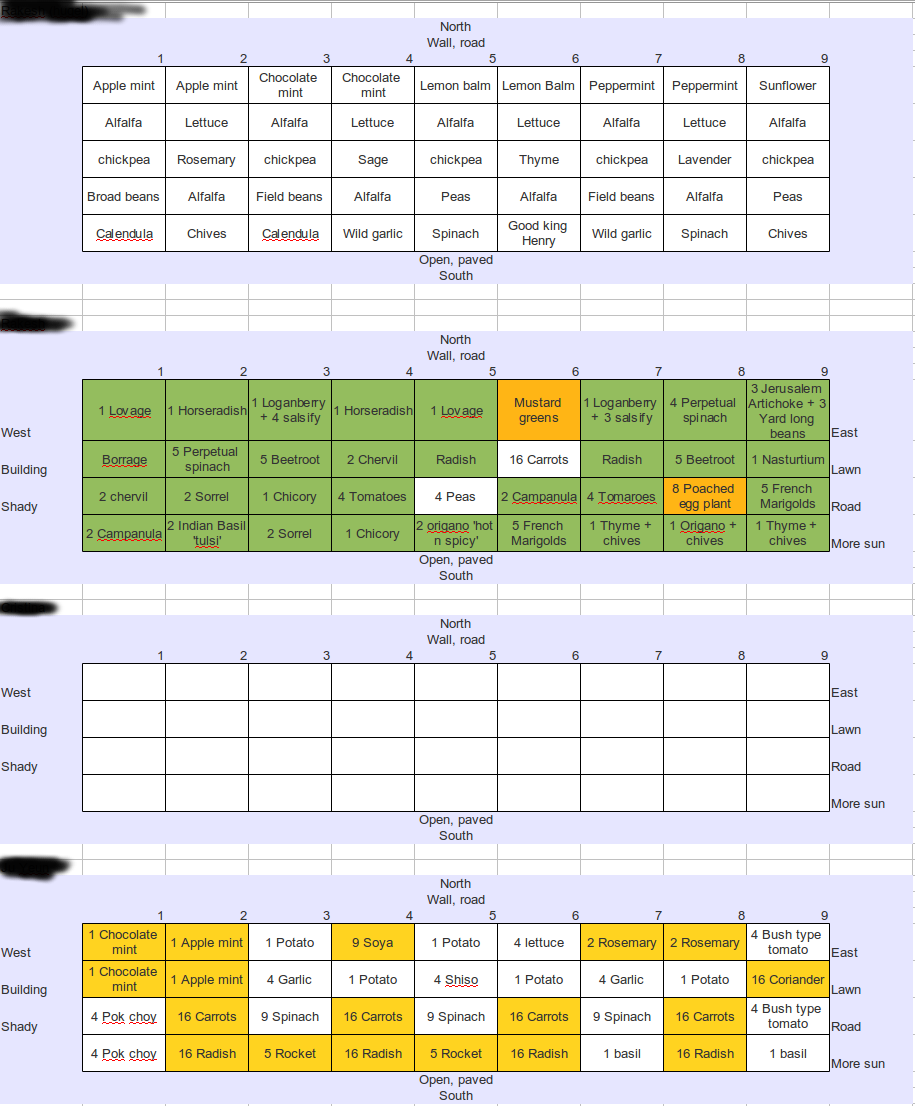
Planting plan
Designing the planting plan was great fun. I gave them all a guide to squarefoot gardening, which included a list of plants and how much space they needed (i.e. how many you could fit into one square foot). I also gave them a guide to companion planting. They then went away and 3 out of 4 of them made a planting plan. The final plot we left empty for experiments and spare plants that emerged.
Implementation
Implementation plan
The plan for implementation was to start with the easy to build sections, and slowly build up to the more complicated elements.We decided in the first year we should make the beds, and the rain capture system, as well as get the compost going. Then over winter or the following year, to start building all the storage spaces, the seated raised bed and the cloche. This we felt was a realistic use of our time and energy.
The actual implementation
So the first thing to arrive were the compost bins. I gave a short talk on composting and how to make good compost and we finally had somewhere on the council estate where we could throw our organic waste. Then we took up the paving slabs and built the squarefoot beds. We used timber that we salvaged from a skip and threw in as much organic matter as we could find. At the same time as making this we were also making a nature garden on the estate, so we had access to a lot of organic waste materials. We were also very friendly with the gardening contractors who also gave us lots of spare materials. Most of the plants we grew ourselves from seed or from cuttings. I ran sessions on making paper pots and different ways of starting seedlings, as well as a session on taking cuttings. Everyone got involved while we were waiting for the beds to be finished we all grew various plants in our houses. We used the grant to buy some compost, and a few herbs and shrubs. We also procured the materials to build the water capture system (as we deemed that the next most important element). The veg in the beds and the hugel started growing well, and everyone was excited. It was a lovely atmosphere, and we were enjoying our time together, but then I had to leave rather suddenly.
Maintenance
Evaluation
What went well:
Was such as lively community spirit, was great to meet so many lovely people and make things happen
The level of sharing and learning that took place was very pleasing
Making the squarefoot garden taught them a lot about right placement and spacing of plants
We had fun planting seedlings and taking cuttings
The design process was also fun as I made sure everyone was involved
What would you do differently
Choose a site that had a more secure long term future (mind you the person had been there 10 years, so we had no idea he would leave so unexpectedly)
Vision
If I had not been forced to move out, I would have loved to keep working with this group. If I were around we could find another place and start again
Next steps
Not much I can do with this project unless I more back into that area, which is very unlikely
Evaluating through ethics
Earthcare: We took a barren lifeless concrete paved area and for the short duration of this project we brought it to life. We had bees and butterflies and compost worms all appear spontaneously. We created a nice environment, rather than destroying the environment, so I am happy met the earthcare ethic in this projetc.
Peope care: This was mainly about people care. It was all about teaching people how to be more self sufficient and to show the benefits of coming together to help each other.
Fairshare: The surplus in this case was the surplus of knowledge, where those of us who had knowledge of growing foods or building shared with others. If we would have had more time, I am sure we would have collected fruits, food, seeds, mulch material, etc and reinvested them wehre appropriate.
Summary
Sadly my father passed away before we could harvest most of the crops. I had to move away from this location, and so was not able to keep up with the project. When I did return the following year, I was told the owner moved out of the house for health reasons. The estate management then promptly destroyed all our beds and returned it to pavement and grass. However, the people who were helping said thay did get a great yield from the beds, and that they learnt a lot about food growing in the one season, and have been growing more plants at home (on balconies, ect). So while the project was not long lived, we had fun and several people got to learn about sustainable ways of growing food.
On reflection perhaps we would have been better off if we had continued to work with the estate office. It may have taken them another year to fulfil their promises, but at least the site would have been secured, and not folded so suddenly. We were also offered some more plots to work on, but we decided that it would be better to get one plot up and running and then take the lessons learnt and before working on the next plot. However we put all our eggs in one basket, and when we lost the site, the whole project collapsed. With hindsight we could have at least started one more site, even if it were not as detailed, but just to get the plot started and looking nice, then when I was away and the owner moved away, they could have put more effort into the second plot.